Building A Rustic Industrial Standing Desk
Info
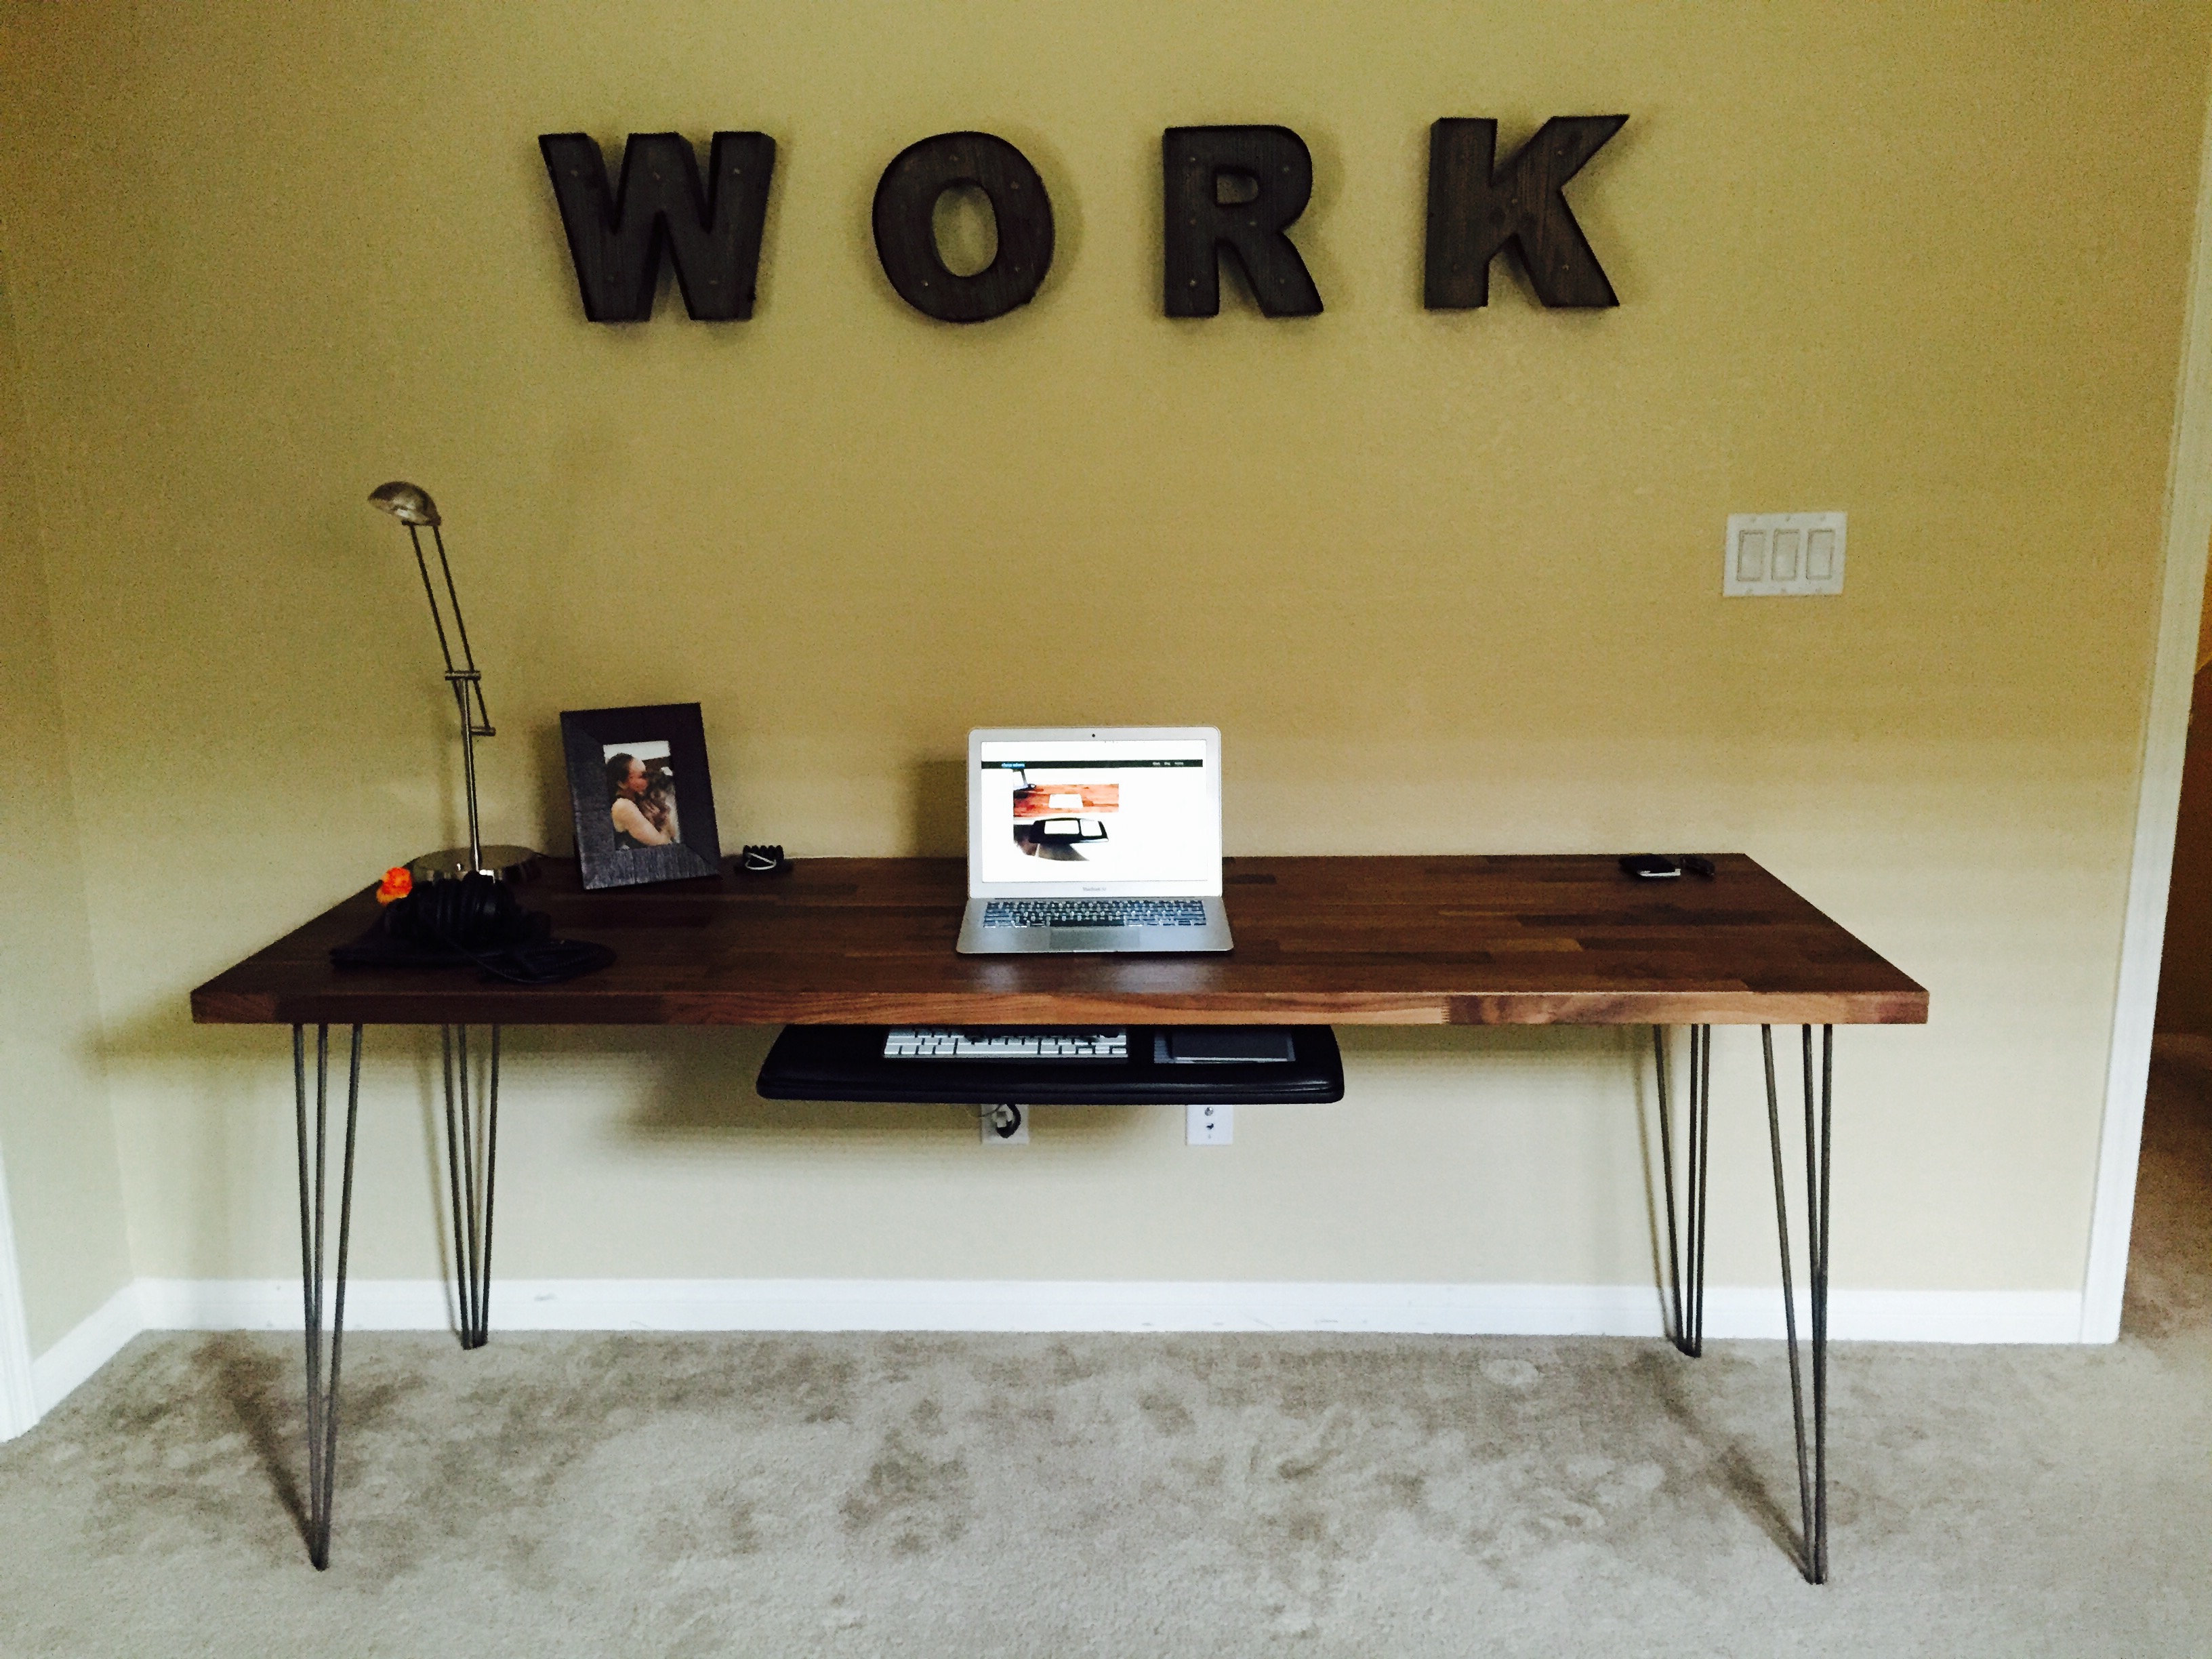
I no longer use this desk, I use an adjustable height sit/stand desk, you can check it out in my desk setup.
This weekend I decided to build a standing desk. It was a lot of work, but with a little time, a little intuition, a few trips to Home Depot and a couple of setbacks, I am now writing this post from my rustic industrial standing desk!
Hopefully this detailed summary and retrospective will be enough inspiration and documentation for you to go and build your own.
A Good Desk Is Hard To Find
If you've ever done research online to find a desk, you've probably been exactly where my wife, Jackie, and I have been: lost.
There are a lot of desks out there, but finding one both parties can agree on is hard, and finding one that's in a store for you to look at makes it nearly impossible. Throw into the mix that I have started standing to do work, which means I'd like a standing desk, and you have yourself a Herculean task.
After hours (spanned over the course of 2 weeks) of doing research and finding no good solutions for under $1500, on a whim, Jackie and I decided Saturday morning to just build our own standing desk.
What follows is the process of going from a mere idea to a tangible desk, a retrospective of what I learned (and some gotchas) and some thoughts on what I would have done differently.
The Idea
This project started as all good weekend warrior projects start: A trip through Google Image Results and Pinterest.
Jackie has been into the rustic industrial look lately, and as I'm a huge fan of wood and metal, rustic industrial was the easy decision.
The desk we found that we liked best as a starting reference was the Postobello Industrial Metal And Rustic Wood Desk: a sitting desk ($945). What stood out was the minimalist look (no drawers or frills), the dark metal on the bottom and the rustic wood. The major modification we had to the idea itself was to use pipes.
I looked around the internet for a little bit longer and stumbled onto a DIY tutorial on rustic pipe workbench. This was exactly what I needed to get an idea of where to start.
The Sketch
The first thing I did was figure out what the height needed to be so the desk would be at a 90 degree angle to my elbows while standing. For me, it was around 44".
After sketching it out, I figured out that I'd need certain pieces, and I was adding up the lengths of all the pipes to make sure I had the exact right lengths.
I'd suggest not doing it this way. Once you've figured out the types of pieces you need, just go down to the building supply (Home Depot in my case), and start piecing stuff together to make sure that, with an extra 3.5" (taking into account the height of your runner boards and top boards), the pipes will give you a good 90 degree angle at your elbow.
I ended up having to redo my math while I was in Home Depot anyways, so it would've saved me a lot of time to just go down there and physically put together a single leg for testing.
The Pre-Build
I made a material list in Excel based on the sketch and a cursory look at homedepot.com. This helped me come up with a good estimate for about how much it would cost. The Raw Materials list below is the final material list, and this list came in about $50 under my original estimate, mostly because I ended up getting black iron pipe where I'd originally estimated galvanized steel pipe.
Raw Materials
| Count | Material | Length |
|---|---|---|
| 3 | 2 x 6 #2 & Better Douglas Fir Lumber (cut to 66") | 8' |
| 1 | 2 x 4 Premium Kiln-Dried Whitewood Stud (cut to 3 30" pieces) | 96" |
| 1 | #8 x 2-1/2 in. Phillips Bugle-Head Coarse Thread Sharp Point Drywall Screws | 1 lb. Pack |
| 1 | MinWax 8 oz. Oil-Based Espresso Wood Finish Interior Stain | - |
| 1 | Varathane 1-qt. Matte Soft Touch Polyurethane | - |
| 2 | PRO GRADE PRECISION 2-1/2 in. x 4 in. x 1 in. 120 Grit Fine Block Sanding Sponge | - |
| 8 | 1 / 2" Black Iron Floor Flange | — |
| 8 | 3 / 4" Black Malleable Iron Threaded Tee | — |
| 8 | 3 / 4" x 1 / 2" Black Malleable Iron FPT x FPT Reducing Coupling | — |
| 8 | 1 / 2" Close Black Steel Nipple | — |
| 4 | 3 / 4" Black Steel Nipple | 2" |
| 4 | 3 / 4" Black Steel Nipple | 6" |
| 4 | 3 / 4" Black Steel Nipple | 12" |
| 4 | 3 / 4" Black Steel Nipple | 24" |
I suggest going to your local building material supplier (yes, I'm promoting my family's building supply company) if they carry all of this stuff, but I ended up at Home Depot because it was the closest supplier I could find.
The Build
I decided to start with the processes that could be done synchronously with the lumber to make sure I minimized the build time, so the first step was to sand the 6 pieces of lumber to a really smooth finish.
Sanding the Lumber
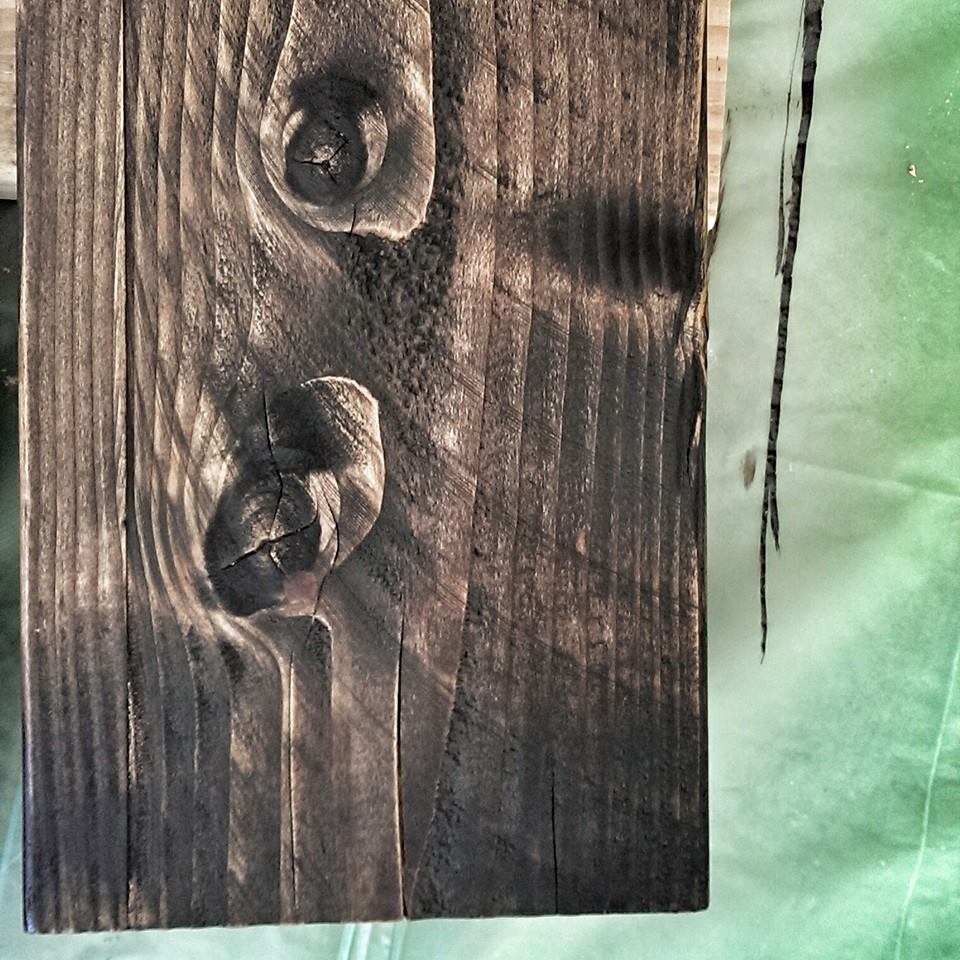
Sanding is an important part of the process for a few reasons. It will create a smooth surface, but more importantly, it opens the pores of the lumber and removes a surface glaze left by the mill's saw blades. A good sanding session made the lumber more receptive to the stain and left a richer finish.
Staining the Lumber

After sanding, I wiped the boards with a cloth just to make sure all the sawdust particles were removed and laid my first coat of stain. I started with my 30" pieces, since they were going to be under the desk and less visible, just to make sure I liked the color.
I let the stain rest for about 15 minutes and then wiped it off with two dry clothes, making sure to remove any residual stain that hadn't soaked. If I'd let it sit without wiping, it would've left dark droplets and pools of stain, which can make the wood look super janky.
I was really impressed with the color, so I followed the same process for the 2 x 6 boards, making sure to stain the top, the ends and the sides. I followed the same time (15 minutes) before wiping. These boards came out looking even better than the 2 x 4 pieces had.
Note: I only stained the exposed parts of the wood, so the center piece didn't get stain on the sides and the bottom runners didn't get stain on the side that was drilled down to the 2 x 6 pieces.
Assembling the Legs
While I let the stain soak and dry, I started on the pipe assembly. On my first trip (there were so many trips to Home Depot over the weekend), I picked up Galvanized pipes, primer and black Rustoleum paint for metal.
DO NOT DO THIS. There are a few good reasons I should've just gotten black pipes since I wanted them to be black in the end anyways:
- The process of preparing galvanized pipes for painting is a nightmare (based on what I've read online). Essentially the process of galvanizing adds a coat of zinc, which paint will just roll right off of.
- The whole point of galvanized metal is to help it standup to the elements. My officespace at home has never, and hopefully will never, have the problem of needing to stand up to elements.
- Black pipe is cheaper anyways. I ended up saving around $50-$60 exchanging my galvanized pipe for black pipe, so it was worth it in price alone.
Cleaning
Once I'd gotten my black pipes, it was time to clean them. Getting stickers off of metal is kind of tricky. We had a hard time getting the tape that was wrapped around the pipe off, so I put my pipes in the back of the car (in Vegas it was kind of hot, so in the car it was really hot) for about an hour. When I pulled them out and peeled the tape, it came right off. Lesson learned: Just heat tape and stickers for easier removal.
I used Goo Gone to remove any of the residual sticker, which made short work of cleaning the 12 pipes that had something on them.
Assembly

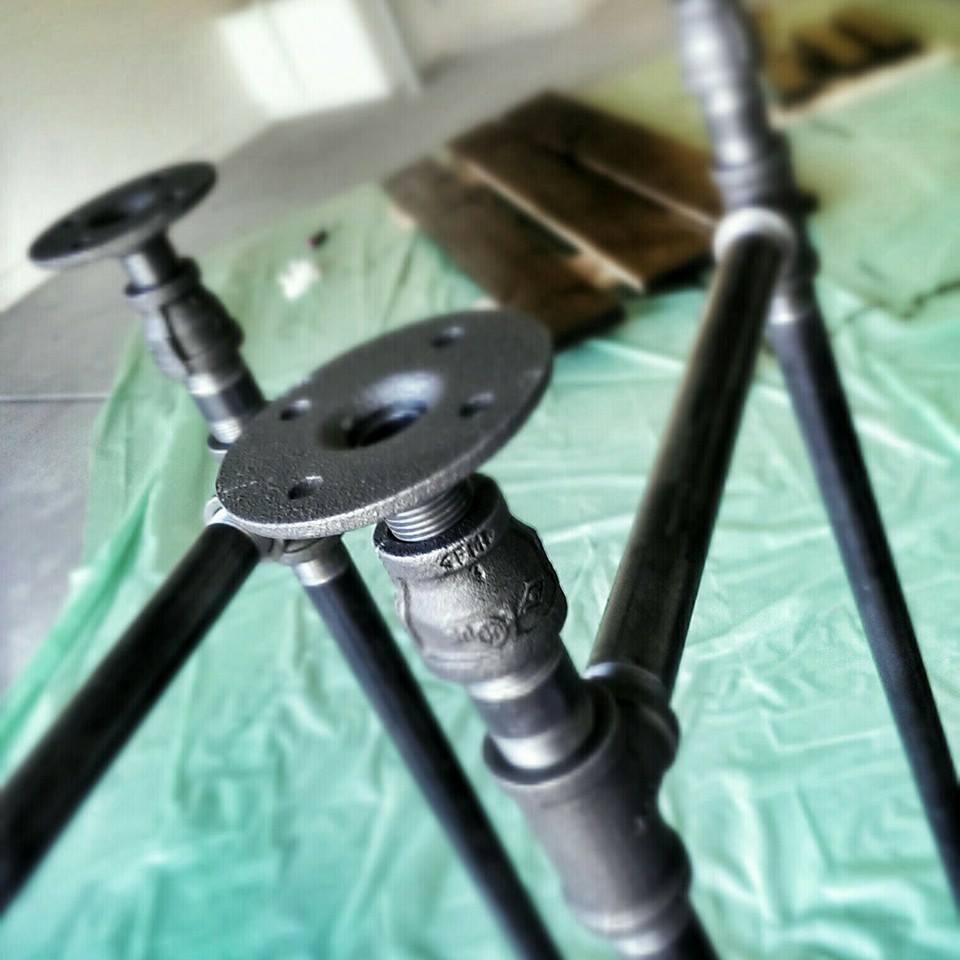
After drying my pipes, it was time for assembly of the legs. I couldn't find any 3 / 4" floor flanges in black at my local Home Depot, so I modified my configuration a little bit and bought 1 / 2" (I would've gone with 1" if they'd had those) floor flanges, a 1 / 2" close to connect to the flange and a reducing coupling to connect the 3 / 4" pipe to the 1 / 2" close.
That seemed like it would've cost more than a 3 / 4" floor flange itself, but the price pretty much evened out, and it gave it a unique look instead of just going straight from the pipe to the floor flange.
Next, I assembled the feet and the "heads" of the legs with the metal Tees. I tightened everything down with a monkey wrench because I wanted to make sure if there was going to be any instability or rocking, it didn't happen because I didn't do my due diligence to tighten everything down.
I then connected the horizontal bar between the feet, but didn't tighten it down all the way. I added the 24" vertical bars and attached the heads via the Tees to the 24" bars and my legs were one step away from being complete.
This is where I hit my first assembly snag.
I wanted everything to be connected tightly, but because of the way the threads work, I couldn't tighten the top horizontal bar all the way. If I tightened it all the way on one side of the Tee, it would, by nature of physics, loosen it from the other side.
So I tightened it down as best as I could by hand to one Tee, placed the pipe's end in the receiving end of the other Tee where I knew it would thread right away, and loosened the pipe from the Tee I'd tightened it into. The end result was a mostly tightened horizontal bar, which was the best I could've asked for under the circumstances.
Re-Staining
Once my legs were complete, it was time for another coat of stain. I followed the same process of staining I followed for the first run. I didn't stain the sides of the middle board that sat on the top of the desk because I knew I was going to use wood filler.
After two coats of stain, it was time to add the varnish. I varnished all sides of each piece 2 times, with a 3-4 hour dry time between each run.
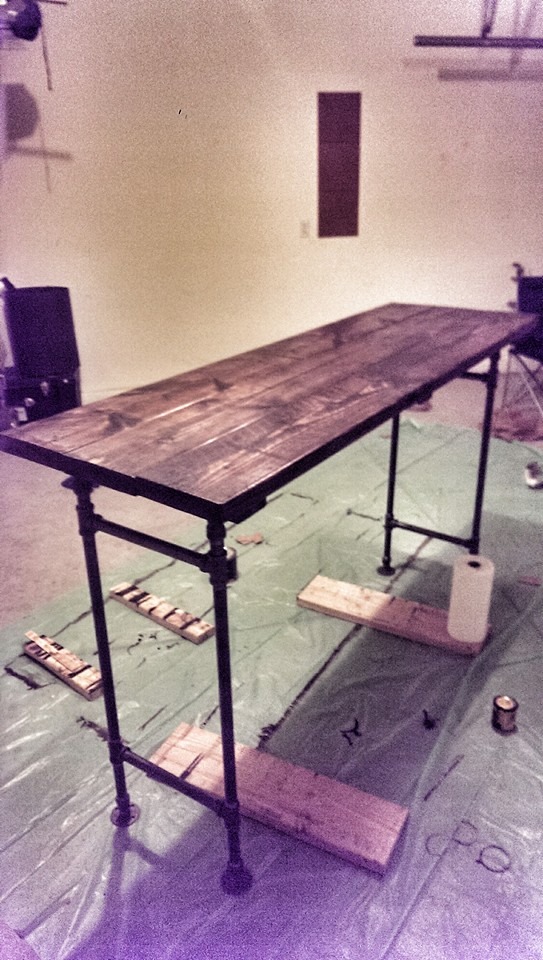
Once my second coat of varnish had dried, it was time to assemble the desk.
Assembling the Entire Desk
I started by pre-drilling holes into the 2 x 4 runners on top of the 2 x 6 pieces. Pre-drilling holes helps to minimize the possibility of the wood splitting when screwing the pieces together.
I used a drill bit that was a little wider than the thread of my screws. The outside 2 x 4 runners were 2-3 / 4" away from the short edge of the desk and 1" away from the frontand back of the desk. The center 2 x 4 runner was fastened with it's center at 33" (the center of the desk on the long edge).
I used drywall screws instead of wood screws because they're less likely to split your lumber, they don't need to standup to the elements and they're black (which blends really well with the espresso stain).8
Once the desktop was fastened together, I added the legs. Jackie helped hold the legs while I made marks for where to pre-drill the hole. I did this by drilling into the board just enough to make a mark. In hindsight, I probably would've used a sharpie to make these marks, because the drill didn't go straight down (it bumped against the legs of the table), which caused a screw or two to fasten a little off kilter.
After making marks, I pre-drilled the holes without the legs on the table, to ensure straight holes for the screws. We put the legs back on the table and fastened them with the 2-1 / 2" drywall screws. We flipped the desk over to stand on its legs after we'd completed fastening the legs to the desktop, and it was looking good. There was a little rock if you tried to jostle it on the long edge, but not anymore than I'd expected.
Now that the table was assembled, it was time for the wood filler and one more coat of varnish.
One step too far
I'm just going to say it right now: Don't use wood filler for filling gaps between boards if you're not a professional.
Personally, I feel like I messed up my desk adding the wood filler, mostly because I wasn't good at it at first. It was really messy and, I'm of the belief, that it's a skill you have to practice before you use it in the real world.
I added a coat of varnish after the wood filler (that's 3 coats total for the desk), which helped a little to make the wood filler look better, but didn't help totally.
Note: I went back and sanded down the final coat of varnish and wood filler, and revarnished it, which looked much better. Here's the final wood filled result:
Final Thoughts on the Build and the Buy
The total cost of parts was around $250, which was a huge savings. Generally, in these kinds of projects I like to take into account my "labor" but since it was a project for fun, I didn't really consider it worthwhile to keep up with my time.
As of this writing (2014 / 10 / 08), the desk is "stable" but a little rocky. depending on how my usage goes this week, I might add a stabilizing pipe to the back long edge to make it really stable.
The next step is to build a laptop stand. When working at a standing desk, it's good to have a separate keyboard at your elbow level and your laptop/monitor at or around eye-level. Personally, I think this part is crucial to the long-term health of your neck.
My Retrospective
I've added bits and pieces of my retrospective through my build walkthrough, but I wanted to add some thoughts about what I felt went well, what I felt I could've gone better and what I wish I'd known before hand.
What Went Well
- Sanding, staining & varnishing were the easiest/most successful tasks of the whole project.
- Once I figured out how to get the legs totally assembled, they turned out as good as I'd hoped for.
What I Felt Could've Gone Better
- In hindsight, I didn't think about cable management, but I think over the next weekend I'm going to give it some thought and find a solution. Thanks to @o2dazone (brandon murry) for the protip.
- I would've liked to have thought about having a pipe to stabilize the long edge that ran along the back. Based on my current configuration, I could probably still hack it to get it the way I want it.
- Wood filling. Wood filling. Wood filling. That's how badly that went. I should've practiced on something (the bottom) just to make sure I knew what I was doing.
What I Wish I'd Known
- Don't get galvanized pipes to paint, if they're going to be black eventually anyways.
- Adding a second set of horizontal pipes, on the short edge, to a set of legs is significantly more complex/difficult than just having one horizontal pipe on the legs.
I'll continue to add my retrospective thoughts if anymore come to me, so be sure to check back every now and again for updates.
I hope this helps inspire you to build your own standing desk and gives you the beginning resoures you need to go your own way!
One final photo:
If you feel like I missed anything in the build process or have questions unanswered, feel free to add a comment below!
